
웹 페이지에서는 동기적 동작과 비동기적 동작이 발생할 수 있다. 이번 포스팅에서는 spring boot를 이용해 동기와 비동기 동작에 대해 알아본다.
Synchronous
동기적 방식은 하나의 요청이 발생하고 해당 요청이 끝나기 전까지 다른 작업을 할 수 없는 방식이다. 하나의 요청에서 응답이 온 후 다음 요청을 보낼 수 있다.
Asynchronous
비동기적 방식은 여러개의 요청을 동시에 처리가 가능하다. 하나의 요청이 끝나기 전 다른 요청을 할 수 있다. 요청이 발생한 후 다른 작업을 하다가 요청한 작업이 종료되면 이후의 작업을 진행하게 된다.
이제 spring boot에서 동기와 비동기 동작을 간단하게 알아본다. 요청에서 동기와 비동기를 나누는 기준은 client가 요청하는 방식에 따라 나눠진다. Form을 사용한 요청은 동기적 방식이며, fetch나 axios를 사용하여 요청하는 방식은 비동기적 방식이다. 아래 예제에서는 form과 fetch를 사용해서 Controller와 RestController로 요청하여 응답이 어떻게 이뤄지는지 확인한다.
Synchronous request
Controller로 요청하기
Form으로 요청하는 방식이 동기적 방식이다. Form 태그는 Http 메소드를 명시하여 요청한다. GET과 POST 방식으로 설정하여 요청할 수 있다.
1
2
3
4
5
6
<!--동기 동작 Controller -->
<form action="/hello" method="get">
  <p>sync form controller jsp로 넘어감</p>
  id <input name="id" /> pw <input name="pw" />
  <input type="submit" value="sync action" />
</form>
1
2
3
4
5
6
7
@GetMapping("hello")
public String hello(@RequestParam Map<String, String> map) {
    System.out.println(map.get("id"));
    System.out.println(map.get("pw"));
    System.out.println("hello controller");
    return "hello";
}
먼저 Controller로 요청하는 동기적 방식이다. Controller 클래스에는 @Controller 어노테이션이 붙어있다. Form에서 “/hello”로 요청을 하게되면 Map에 id와 pw가 담겨 @RequestParam으로 넘어온다. 시스템 출력을 확인해보면 다음과 같다. Form에는 id에 id, pw에 1234를 넣어줬다.
1
2
3
id
1234
hello controller
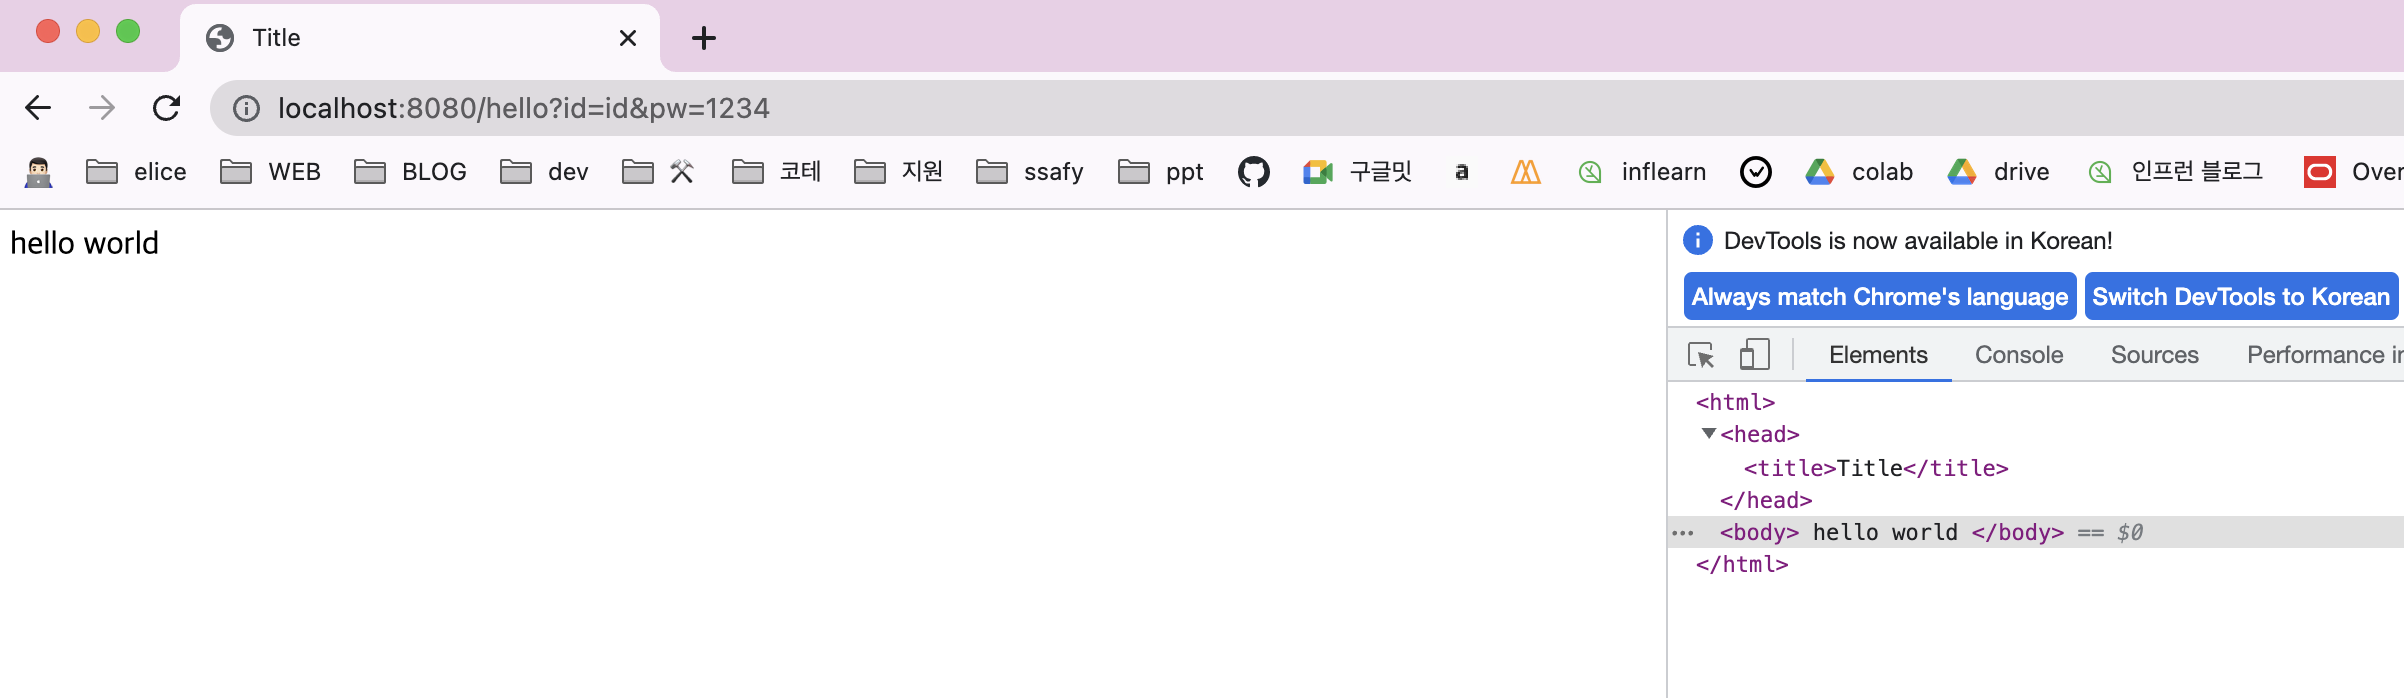
시스템 출력에는 위와 같이 출력되며 출력된 후 return “hello”를 통해 webapp/WEB-INF/views에 있는 hello.jsp가 호출된다. 개발자 도구를 확인해보면 hello.jsp와 동일한 구조를 가진 페이지가 보여지게 된다.
1
2
3
4
5
6
7
8
9
10
<%--hell.jsp--%> <%@ page contentType="text/html;charset=UTF-8" language="java"
%>
<html>
  <head>
    <title>Title</title>
  </head>
  <body>
    hello world
  </body>
</html>
RestController로 요청하기
동기적 방식에서 RestController로 요청하는 경우를 알아본다. POST 방식으로 요청하여 확인해 본다.
1
2
3
4
5
6
<!--동기 동작 RestController -->
<form action="/syncrest" method="post">
  <p>sync form restcontroller 문자열만 화면에 나옴</p>
  id <input name="id" /> pw <input name="pw" />
  <input type="submit" value="sync action" />
</form>
1
2
3
4
5
6
7
@PostMapping("syncrest")
public String resthello(@RequestParam Map<String, String> map) {
    System.out.println(map.get("id"));

    System.out.println("hello rest controller");
    return "hello REST";
}
RestController로 요청하는 동기적 방식이다. Controller 클래스에는 @RestController 어노테이션이 붙어 있다. RestController는 Controller와 ResponseBody가 포함되어 있는 어노테이션이다.
Form에서 “/syncrest”로 post요청을 하게되면 @RequestParam으로 map 형태로 받아온다. 시스템 출력을 확인해보면 아래와 같다.
1
2
id
hello rest controller
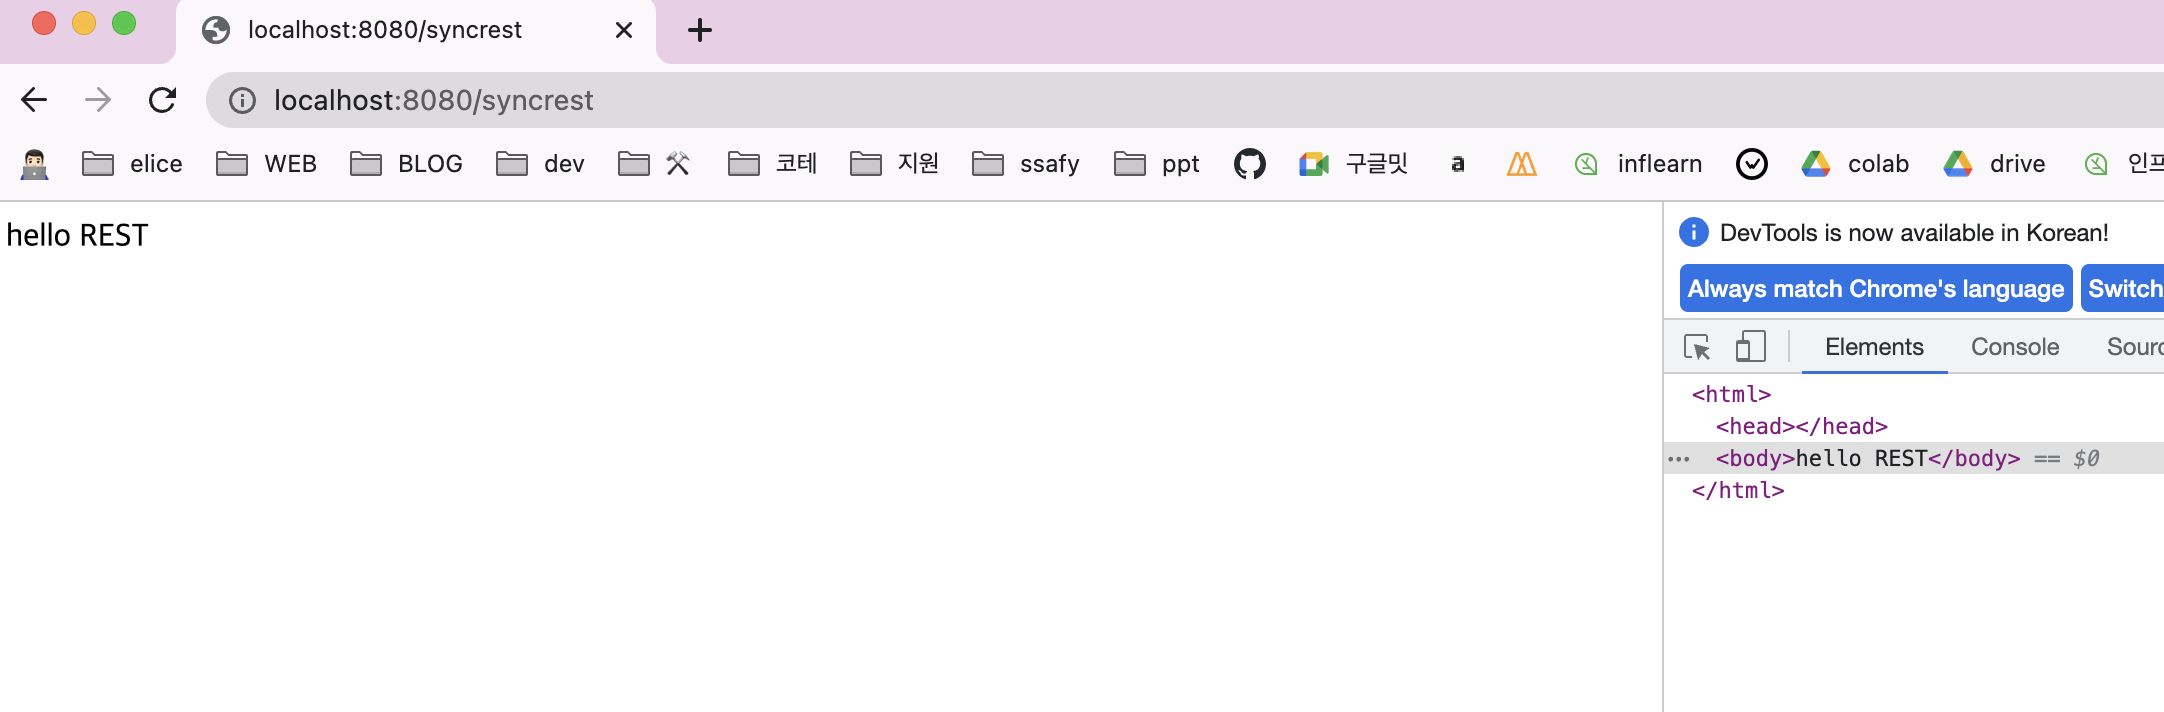
RestController형태이므로 반환되는 형태는 html body가 반환된다. 개발자 도구를 확인해 보면 body 태그 안에 반환되는 문자열이 출력된다.
동기적 방식으로 Controller와 RestController로 요청한 결과를 알아보았다.
Asynchronous request
Controller로 요청하기
1
2
3
<p>controller async</p>
async id<input id="asyncid" /> async pw<input id="asyncpw" />
<input type="button" id="asyncBtn" value="async" />
1
2
3
4
5
6
7
8
9
10
11
12
13
14
15
16
document.querySelector("#asyncBtn").addEventListener("click", async () => {
  let id = document.querySelector("#asynccontrollerid").value;
  let pw = document.querySelector("#asynccontrollerpw").value;

  let data = {
    method: "post",
    body: JSON.stringify({ id, pw }),
    headers: { "Content-Type": "application/json" },
  };

  data = await fetch("asynccontroller", data);
  data = await data.text();
  alert(data); // return 값은 "hello"이고 alert 창에 hello.jsp가 보이게 된다.
  data = JSON.parse(data);
  // alert(data);
});
1
2
3
4
5
6
7
@PostMapping("asynccontroller")
public String helloworld(@RequestBody Map<String, String> map) {
    System.out.println(map.get("id"));
    System.out.println(map.get("pw"));
    System.out.println("hello controller");
    return "hello";
}
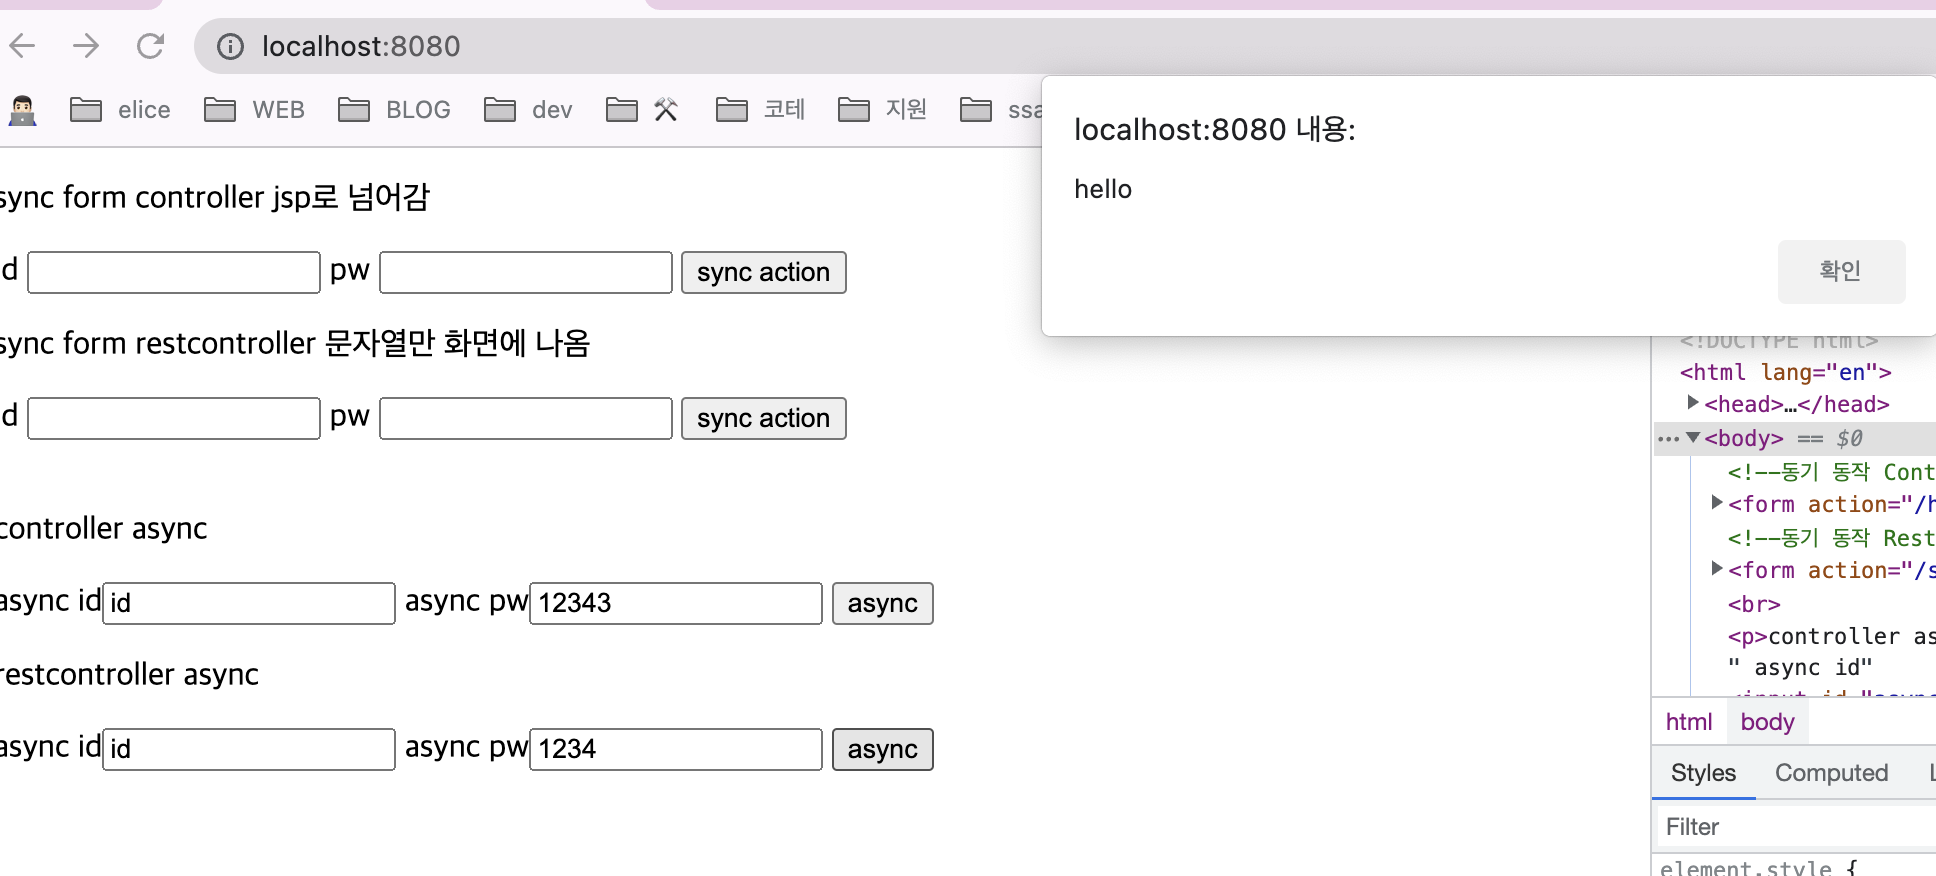
비동기 동작은 fetch나 axios를 사용하여 요청한다. 위 코드는 비동기 방식으로 Controller로 요청하는 경우이다. fetch를 사용해 post 방식으로 요청을 보낸다. Fetch 요청을 한 후 응답을 alert에 띄우기 위해 async 함수를 사용하고 요청에 await을 붙여준다. await을 붙여줘 fetch가 끝날 때 까지 기다린다. await가 붙지 않으면 fetch 요청이 끝나기 전에 다음 줄이 수행되므로 data에 값이 없게 된다.
Java코드를 보게되면 요청을 받은 후 반환하는 값이 문자열이다. Controller에서 반환되는 값은 jsp의 파일 이름인 것을 위에서 보았다. Controller로 요청되는 비동기 동작에서 fetch가 요청한 후 받게되는 응답은 hello.jsp를 html 텍스트로 받게 된다.
위 javascript 코드에서 alert 창에 띄워지는 데이터는 hello.jsp가 띄워진다. (hello.jsp 코드는 동기적 방식에 있다.)

RestController로 요청하기
1
2
3
4
5
<p>restcontroller async</p>
async id<input id="asynccontrollerid" /> async pw<input
  id="asynccontrollerpw"
/>
<input type="button" id="asyncControllerBtn" value="async" />
1
2
3
4
5
6
7
8
9
10
11
12
13
14
15
16
17
18
document
  .querySelector("#asyncControllerBtn")
  .addEventListener("click", async () => {
    let id = document.querySelector("#asynccontrollerid").value;
    let pw = document.querySelector("#asynccontrollerpw").value;

    let data = {
      method: "post",
      body: JSON.stringify({ id, pw }),
      headers: { "Content-Type": "application/json" },
    };

    data = await fetch("resthello", data);
    data = await data.text();
    alert(data); // return 값인 hello가 온다
    data = JSON.parse(data);
    // alert(data);
  });
1
2
3
4
5
6
7
@PostMapping("resthello")
public String hello(@RequestBody Map<String, String> map) {
    System.out.println(map.get("id"));

    System.out.println("hello rest controller");
    return "hello";
}
비동기 동작으로 RestController에 요청하는 방식을 알아보자. Fetch 동작은 Controller에 요청하는 것과 같다.
RestController의 “/resthello”로 요청이 들어오게되고, 반환되는 값은 hello이다. RestController는 html body를 반환하기 때문에 아래와 같은 결과가 나오게 된다.
Fetch 동작이 끝난 후 alert 창에 data를 띄워보면 RestController에서 반환된 “hello”가 출력되는 것을 알 수 있다.
다시한번 정리하면 동기와 비동기 동작을 나눌 수 있는 것은 client의 요청 방식에 따라 달라지게 되고, Controller와 RestController의 반환되는 타입에 따라 jsp페이지가 넘어가거나 html body가 응답으로 넘어가게 된다.